Week 1: Introduction I
1 Basic Building Blocks of RStudio
1.1 Learning objectives
The learning objectives for today are:
- Become familiar with the user interface in RStudio
- Practice basic coding in the R Console
- Open an R script and create basic objects in RStudio
- Understand different data types
- Data entry and variable creation in RStudio
These objectives serve as a gateway to learning RStudio and building a strong foundation. Let us begin!
1.2 RStudio Interface (Length: 00:07:08)
When you open RStudio for the first time, you are greeted by its interface. The window is divided into three panels:
- R Console
- Environment
- Files, Help, and Output
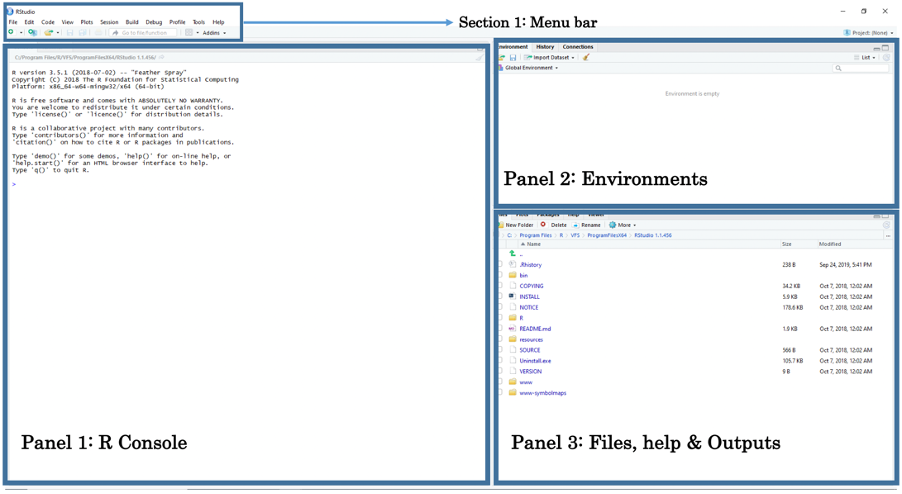
- Panel 1: The R Console allows you to type R code to perform quick commands and basic calculations. It also reports whether code executions from scripts are successful or have failed.
- Panel 2: The Environment shows the objects currently stored in RStudio’s memory, such as values, vectors, data frames, and spatial objects.
- Panel 3: This panel contains several tabs. The most important are: (i) Files: access folders on your computer to open datasets; (ii) Help: view help documentation for functions and commands; and (iii) Plots: review the plots you generate (e.g., histograms, scatterplots, maps).
The section at the top of RStudio is the Menu Bar. From here, you can access functions for saving, editing, and opening a new Script File. Opening a new Script File reveals a fourth panel above the Console.
You can open a Script File by:
- Clicking on the File tab in the Menu Bar. A drop-down menu will appear. Scroll to New File. Under New File, click R Script. This opens a new script titled Untitled 1.
Important
Throughout the course, and in all practical tutorials, you will be encouraged to use an R Script to collate and save the code you write for any statistical or spatial analysis. However, we will only begin working with scripts in section 1.4 of the tutorials. For now, let’s start with the absolute basics: interacting with the R Console and using it as a simple calculator for typing basic code.
1.3 Using R Console as a Calculator (Length: 00:07:26)
The R Console window (Panel 1) is where RStudio waits for you to tell it what to do. It displays the code you enter and the results of each command. You can type commands directly into this window for immediate execution.
Let’s begin by using the Console as a basic calculator for addition (+), subtraction (-), multiplication (*), division (/), exponents (^), and other calculations.
Click inside the R Console window, type 19+8, and press the Enter key (↵) to see the result. Then try the following calculations by typing them into the Console:
# Perform addition
19+8

# Perform subtraction
20-89

# Perform multiplication
18*20

# Perform division
27/3

# To number to a power e.g., 2 raise to the power of 8
2^8

# Perform complex sums
(5*(170-3.405)/91)+1002
Important
The text that follows a hash symbol # in the code chunk is a comment, not actual code. It explains what the line of code without the # is doing.
In addition to basic arithmetic operations, we can also use common mathematical functions such as exponentials and logarithms:
exp()calculates the exponentiallog()calculates the logarithm
Do not worry about fully understanding these functions for now as you will likely use them later in Weeks 8 and 9 when transforming variables.
Try the following by typing them into the R Console window:
# use exp() to apply an exponential to a value
exp(5)

# use log() to transforrm a value on to a logarithm scale
log(3)
1.4 Creating basic objects and assignment operator (Length 00:12:59)
Let’s open an R Script file!
Now that we are familiar with using the Console as a calculator, let’s build on this and learn one of the most important features in R: the Assignment Operator.
The arrow symbol <- is called the Assignment Operator. You type it by pressing the less-than symbol < followed by the hyphen -. It allows you to assign values to an object in R.
Objects are stored quantities in RStudio’s environment. They can hold anything from numeric values to character strings. For example, to create a numeric object called x and assign it the value 3, type: x <- 3. When you enter x in the Console and press Enter (↵), R will return the numeric value 3.
Similarly, to create a string object called y and assign it the text "Hello!", type: y <- "Hello!" When you enter y in the Console, it will return the text value Hello!.
Now, let’s create the objects a, b, c, and d and assign them numeric values. Perform the following by typing them into the R Console:
# Create an object called 'a' and assign the value 17 to it
a <- 17

# Type the object 'a' in console as a command to return value 17
a

# Create an object called 'b' and assign the value 10 to it
b <- 10

# Type the object 'b' in console as a command to return value 10
b

# Create an object called 'c' and assign the value 9 to it
c <- 9

# Type the object 'c' in console as a command to return value 9
c

# Create an object called 'd' and assign the value 8 to it
d <- 8

# Type the object 'd' in console as a command to return value 8
d
Notice how the objects a, b, c and d and its value are listed and stored in RStudio’s environment panel. We can perform the following maths operations with these object values:
# type the following and return an answer
(a + b + c + d)/5

# type the following and return an answer
(5*(a-c)/d)^2
Let us create more objects but this time we will assign character string(s) to them. Please note that when typing a string of characters as data you will need to cover them with quotation marks "...". For example, say we want to create a string object called y and assign it with some text "Hello!". We do this by typing y <- "Hello!".
Try these examples of assigning the following character text to an object:
Let’s create more objects, but this time we will assign character strings to them. When typing a string of characters as data, you must enclose them in quotation marks "...".
For example, to create a string object called y and assign it the text "Hello!", type: y <- "Hello!"
Try the following examples to assign character text to objects:
# Create an object called 'e' and assign the character string "RStudio"
e <- "RStudio"

# Type the object 'e' in the console as a command to return "RStudio"
e

# Create an object called 'f', assign character string "Hello world"
f <- "Hello world"

# Type the object 'f' in the console as a command to return "Hello world"
f

# Create an object called 'g' and assign "Blade Runner is amazing"
g <- "Blade Runner is amazing"

# Type the object 'g' in the console to return the result
g
1.5 How to identify data types (Length 00:08:29)
In programming, variables are used to store information, and each has a type determined by the kind of data it holds (e.g., integer, character, factor, logical). Assigning an integer makes the variable type “int.” A variable is simply a reserved memory location where values are stored.
To use R effectively, you need a solid understanding of its basic data types, data structures, and how to work with them.
R has a range of data types. The most common ones are:
- numeric (whole, real or decimal)
- logical
- character
- factor
Below are some basic examples of data points that are classed as character, numeric, or integer values, etc.
- character: “a”, “swc”
- numeric: 2.0, 15.5
- logical: TRUE, FALSE
- factor: 2 levels “boy”, “girl” (text categories with assigned numbers as a label)
You can use the class function i.e., class() on any object to identify its data type. For example, using the class() function on existing objects we created early on (i.e., e and f) in section 1.4 tells us that its a character object.
e <- "RStudio"
f <- "Hello world"class(f)[1] "character"class(e)[1] "character"Another example, using the class() function on existing objects we created early on (i.e., a and b) in section 1.4 tells us that its a numeric object.
a <- 17
b <- 10class(a)[1] "numeric"class(b)[1] "numeric"We are now familiar with using the console and assigning numeric and string to objects, and identifying their data type. Let’s learn who to enter data into RStudio and create our first data frame.
1.6 How to enter data and create variables in RStudio? (Length: 00:16:27)
Here, we will learn some basics coding etiquettes creating a dataset from scratch using the two functions:
c()combine functiondata.frame(): data frame function
As you have already seen, RStudio is an object-oriented software package and so entering data is slightly different from the usual way of inputting information into a spreadsheet (e.g., Microsoft Excel). Here, you will need to enter the information as a Vector object before combining them into a Data Frame object.
Consider this crude example of data containing the additional health information for 4 people. It contains the variable (or column) names id, name, height, weight and gender.
| id | name | height | weight | gender |
|---|---|---|---|---|
| 1 | Kofi | 1.65 | 64.2 | M |
| 2 | Harry | 1.77 | 80.3 | M |
| 3 | Huijun | 1.70 | 58.7 | F |
| 4 | Fatima | 1.68 | 75.0 | F |
Now, when entering data to RStudio it is not like Microsoft Excel where we enter data into the cells of a spreadsheet. In RStudio, data is entered as a sequence of elements and listed inside an object called a vector.
For instance, if we have three age values of 12, 57 and 26 years, and we want to enter this in RStudio in that order, we need to use the combine function c() and combine these three elements into a vector object. Hence, the code will be c(12, 57, 26). We can assign this data by typing this code as age <- c(12, 57, 26). Any time you type age into RStudio’s console it will hence return these three values as a vector unless you chose to overwrite it with different information.
Let us look at this more closely with the id variable in the above data. Each person has a unique ID number from 1 to 4. We are going to list the numbers 1, 2, 3 and 4 as a sequence of elements into a vector using the combine function c() and then assign it as a vector object calling it id.
# Create 'id' vector object
id <- c(1, 2, 3, 4)

# Type the vector object 'id' in console to see output or press the 'run' button
id
[1] 1 2 3 4Now, let us enter the information the same way for the remaining columns for name, height, weight and gender like we did for id:
# Create 'name' vector object
name <- c("Kofi", "Harry", "Huijun", "Fatima")
name
[1] "Kofi" "Harry" "Huijun" "Fatima"# Create 'height' (in meters) vector object
height <- c(1.65, 1.77, 1.70, 1.68)
height[1] 1.65 1.77 1.70 1.68# Create 'weight' (in kg) vector object
weight <- c(64.2, 80.3, 58.7, 75.0)
weight[1] 64.2 80.3 58.7 75.0# Create 'gender' vector object
gender <- c("M", "M", "F", "F")
gender[1] "M" "M" "F" "F"Now, that we have the vector objects ready. Let us bring them together to create a proper dataset. This new object is called a Data frame. We need to list the vectors inside the data.frame() function. For example:
# Create a dataset (data frame)
dataset <- data.frame(id, name, height, weight, gender)

# Type the data frame object 'dataset' in console to print the output in console
dataset
id name height weight gender
1 1 Kofi 1.65 64.2 M
2 2 Harry 1.77 80.3 M
3 3 Huijun 1.70 58.7 F
4 4 Fatima 1.68 75.0 FYou can also see dataset in a data viewer, by using the View() function to see in a spreadsheet:
View(dataset)
Important
The column ‘id’ is a numeric variable with integers. The second column ‘name’ is a text variable with strings. The third & fourth columns ‘height’ and ‘weight’ are examples of numeric variables with real numbers with continuous measures. The variable ‘gender’ is a text variable with strings – however, this type of variable is classed as a categorical variable as individuals were categorised as either ‘M’ and ‘F’.
1.7 How do we create a variable based on other existing variables within a data frame? (Length: 00:21:00)
To access a variable by its name within a data frame, you will need to first type the name of the data frame followed by a $ (dollar sign), and then typing the variable’s name of interest. For instance, suppose you just want to see the height values in the Console viewer - you just type:
# to access height - you need to type 'dataset$height'
dataset$height
[1] 1.65 1.77 1.70 1.68We can use other columns or variables within our data frame to create another variable. This technique is essentially important when cleaning and managing data. From this dataset, it is possible to derive the body mass index bmi from height and weight using the formula:
To generate bmi into our data frame, we would need to access the height (m) and weight (kg) columns using the $ from the data frame its stored to, and apply the above formula as a code to generate the new bmi column:
# Create 'bmi' in the data frame i.e.,'dataset' and calculate 'bmi'
# using the $weight and $height
dataset$bmi <- dataset$weight/((dataset$height)^2)
# View the data frame ‘dataset’ and you will see the new bmi variable inside
View(dataset)
You can overwrite the height (m) column to change its units into centimeters by multiplying it to 100; equally, the weight (kg) column can be overwritten and converted from units of kilograms to grams by multiplying it to 1000.
# using $height and *100
dataset$height <- dataset$height*100
# using $weight and *100
dataset$weight <- dataset$weight*1000
# view updated dataset
dataset
id name height weight gender bmi
1 1 Kofi 165 64200 M 23.58127
2 2 Harry 177 80300 M 25.63120
3 3 Huijun 170 58700 F 20.31142
4 4 Fatima 168 75000 F 26.573131.8 Saving your R script
Well done! You have learnt the basics of coding in RStudio - next week, we will learn further coding etiquettes for managing datasets which includes:
- Importing & exporting spreadsheets with RStudio
- Setting up work directories
- Row and column manipulations
- Merging two data frames.
You can now save your script for future use by clicking on the save icon in the menu bar. Saving an R-script for the first will prompt a Choose Encoding window to appear:
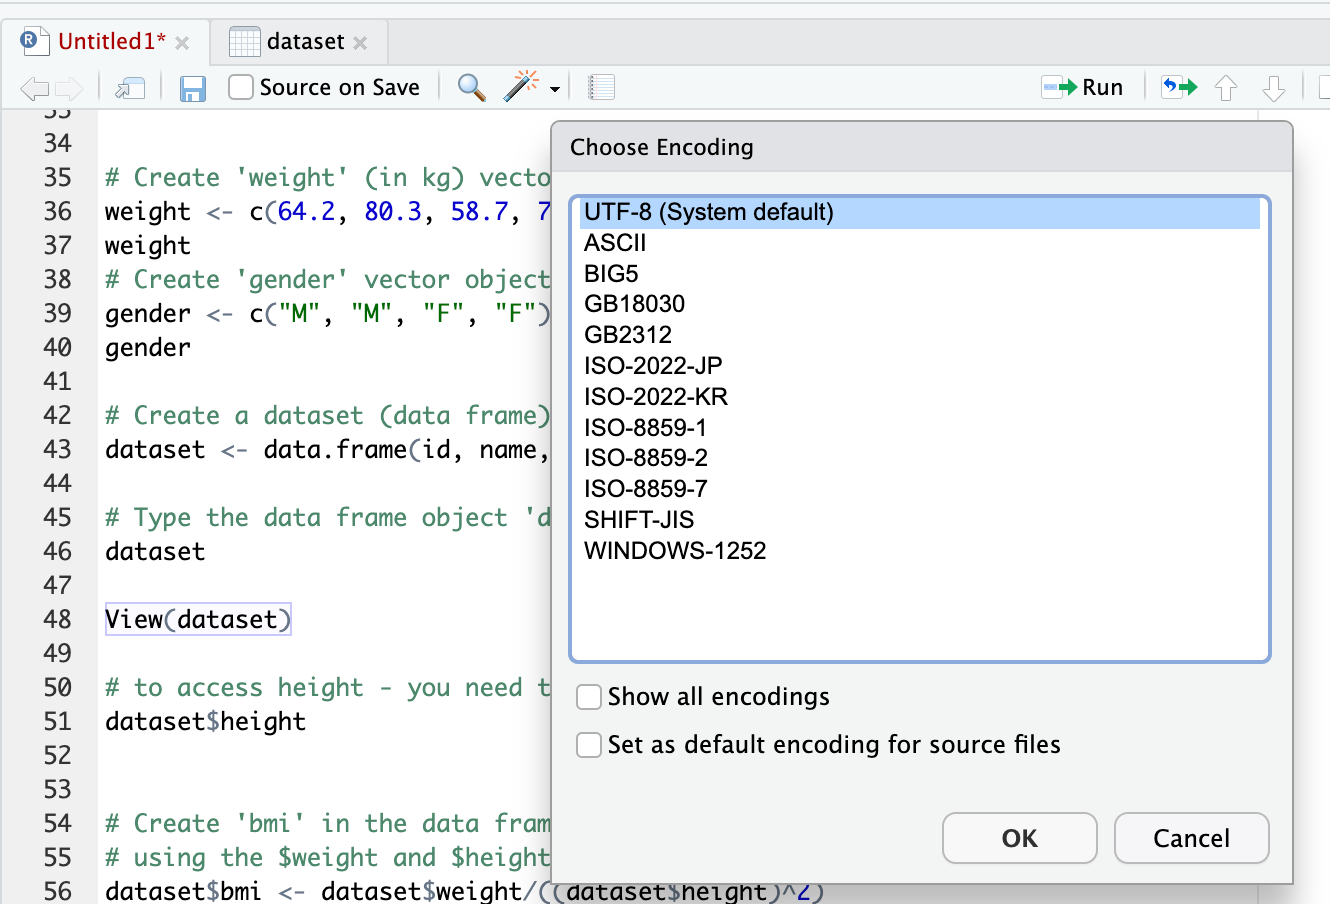
Select the default option UTF-8 (System default) and click OK and then save.