Part 1: Getting started with RStudio
What is RStudio (or R)
R, or RStudio is a statistical software programming package that allows the user to carry out different types of statistical analysis. It can also be used as a GIS software to perform various kinds of analysis on geographical data. In the same vein, you can use it for data managing and geo-processing (i.e., importing different types of data that non-spatial, or spatial formats for manipulation beforehand for analysis). There are two versions:

The famous icon on the left is the version for R (Base), and the one on the right is the version for RStudio. Both software packages are the same. The only difference is that RStudio is attractive, intuitive, and more importantly, it is user-friendly than Base R. So, we will be using this version (i.e., RStudio) throughout this workshop.
Let us talk about downloading RStudio.
Getting started with RStudio (Length: 23:53 minutes)
Watch on YouTube [LINK]
Download and install RStudio directly on to your laptop (BEST OPTION)
RStudio is an open source software, and today its the go-to software for many researchers - its highly recommended for anyone in the domains of data science, scientific research, and technical communication. It is easy to access, and easy to download and install. In order for RStudio to work you must first install R (Base). You can follow the steps and use the table below to download the correct version for your operating system (i.e., Windows or MAC).
STEPS
Download the file (i.e.,
.exeor.pkg) for R (Base) in accordance with your operating system from the links provided in the table below. Next, install it by clicking on the downloaded file (i.e.,.exeor.pkg).Now, we can download the file (i.e.,
.exeor.dmg) for RStudio in accordance with your operating system from the links provided in the table below. You can install it by clicking on the downloaded file (i.e.,.exeor.dmg).
| OS User type | R (Base) | RStudio Desktop |
|---|---|---|
| Windows | R-4.4.2-win.exe | RStudio-2024.09.1-394.exe |
| MAC (Intel) | R-4.4.2.pkg | RStudio-2024.09.1-394.dmg |
| MAC (M1, M2 or M3) | R-4.4.2-arm64.pkg | RStudio-2024.09.1-394.dmg |
Jump straight to this section if you managed to install RStudio successfully.
Else, if you are having difficulties installing RStudio, and installation is a no go because you are using a iPad Pro, Chromebook or some other tablet - then here is an alternative solution. Use the UCL Desktop Cloud system to work remotely and gain access RStudio from your laptop/PC/tablet.
Using the UCL Desktop Cloud system to access RStudio
Remote access to RStudio (Length: 22:39 minutes)
Watch on YouTube [LINK]
To use RStudio (or any other software which UCL provides as service to students) remotely from your laptop/PC/tablet you can:
- Go to https://www.ucl.ac.uk/isd/services/computers/remote-access/desktopucl-anywhere
- Click on the blue button that say: “Log in to Desktop @ UCL Anywhere”
- You will be prompted to enter your UCL username (username[@]ucl.ac.uk) and password. Enter the correct credentials and you are granted access to a remote portal.
- If you see “Use Web browser” select this option. Or if a different option appears i.e., “Full” or “lite version”, then do select the “lite version” – so you can use the remote functions on the fly without having to install any Citrix Workspace Application.
- You should see a Desktop @ UCL Anywhere button – click on this button to finally be granted remote access
- At this stage, it like you are logging into a UCL Workstation in a cluster room, or library. Wait for it and you will be fully logged in.
- Click on the Start button (in the left-bottom corner) of the desktop, and go to the app section and scroll to the RStudio folder
- Click on the latest version UCL has RStudio 4.3.2 and open it once and not multiple times! Kindly wait until it opens.
This is how you access RStudio remotely.
Some general notes:
- Do open your internet browser within this remote window – not outside on you actually computer. Open the online worksheet and download the dataset there and not from you actual computer!
- When downloading, all downloads by default goes to the Download folder.
- UCL Desktops by default uses a Window OS. So, setting up the directory will be akin to how you do the set up normally on your windows PC. Go see the instructions in part two on how you set up work directory. However, because UCL has provided the N: Drive for us instead of C: Drive – you will hence need to set-up you working directory there which will look like:
"N:/GEOG0013/Workshop 1"and not"C:/Users/accountName/Desktop/GEOG0013/Workshop 1" - UCL Desktops provided students access to the N: Drive for storing data, work etc., – so make good use of this facility.
Becoming familiar with the panels in RStudio
Now that you have the set-up for RStudio (either installed or remotely). You should by now have opened RStudio. When opening RStudio for the first time, you are greeted with its interface. The window is split into three panels: 1.) R Console, 2.) Environments and 3.) Files, help & Output.
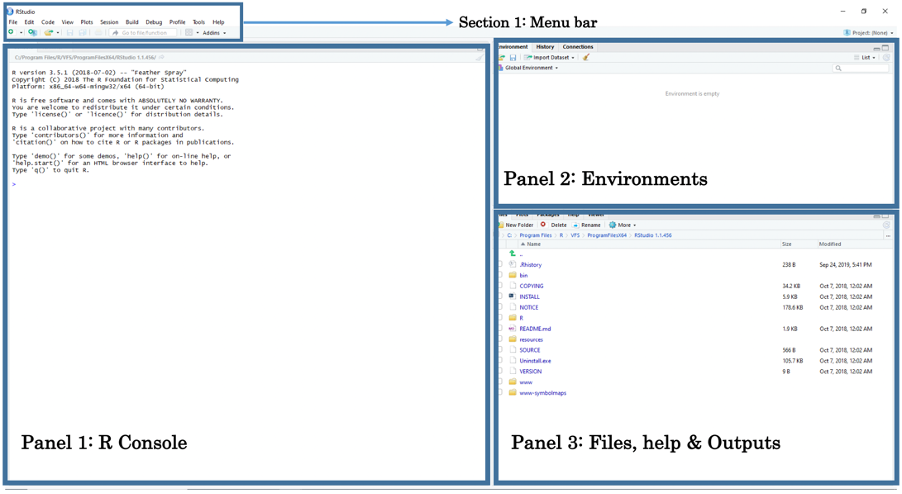
- Panel 1: The Console lets the user type in R-codes to perform quick commands and basic calculations.
- Panel 2: The Environments lets the user see which datasets, spatial objects and other files are currently stored in RStudio’s memory
- Panel 3: Under the File tab, it lets the user access other folders stored in the computer to open datasets. Under the Help tab, it also allows the user to view the help menu for codes and commands. Finally, under the Plots tab, the user can perusal his/her generated plots (e.g., histogram, scatterplot, maps etc.).
The above section is the Menu Bar. You can access other functions for saving, editing, and opening a new Script File for writing codes. Opening a new Script File will reveal a fourth panel above the Console.
You can open a Script File by:
Clicking on the File tab listed inside the Menu Bar. A scroll down bar will reveal itself. Here, you can scroll to the section that says New File.
Under New File, click on R Script. This should open a new Script File titled “Untitled 1”.
Important Notes: Throughout the course, and in all practical tutorials, you will be encouraged to use an R Script for collating and saving the codes you have written for carrying out spatial analysis. However, we will start writing codes in a script in part 2 of the tutorials. For now, let us start with the absolute basics, which is interacting with the R Console and using it as a basic calculator for typing simple code.
Using R Console as a Calculator
The R console window (i.e., Panel 1) is the place where RStudio is waiting for you to tell it what to do. It will show the code you have commanded RStudio to execute, and it will also show the results from that command. You can type the commands directly into the window for execution as well.
Let us start by using the console window as a basic calculator for typing in addition (+), subtraction (-), multiplication (*), division (/), exponents (^) and performing other complex sums.
Click inside the R Console window and type 19+8, and press enter key button ↵ to get your answer. Quickly perform the following maths by typing them inside the R Console window:
# Perform addition
19+8

# Perform subtraction
20-89

# Perform multiplication
18*20

# Perform division
27/3

# To number to a power e.g., 2 raise to the power of 8
2^8

# Perform complex sums
(5*(170-3.405)/91)+1002
Important Notes: The text that follows after the hash tag # in the above code chunk is a comment and actual code. It is there telling you what the code without hash tag # in front of it is doing.
Aside from basic arithmetic operations, we can use some basic mathematical functions such as the exponential and logarithms:
exp()is the exponential functionlog()is the logarithmic function
Do not worry at all about these functions as you will use them later in GIF2 to come for transforming variables. Perform the following by typing them inside the R Console window:
Creating basic objects and assigning values to it
Now that we are familiar with using the console as a calculator. Let us build from this and learn one of the most important codes in RStudio which is called the Assignment Operator.
This arrow symbol <- is called the Assignment Operator. It is typed by pressing the less than symbol key < followed by the hyphen symbol key -. It allows the user to assign values to an Object in R.
Objects are defined as stored quantities in RStudio’s environment. These objects can be assigned anything from numeric values to character string values. For instance, say we want to create a numeric object called x and assign it with a value of 3. We do this by typing x <- 3. When you enter the object x in the console and press enter ↵, it will return the numeric value 3.
Another example, suppose we want to create a string object called y and assign it with some text "Hello!". We do this typing y <- "Hello!". When you enter y in console, it will return the text value Hello.
Let us create the objects a,b, c, and d and assign them with numeric values. Perform the following by typing them inside the R Console window:
# Create an object called 'a' and assign the value 17 to it
a <- 17
# Type the object 'a' in console as a command to return value 17
a

# Create an object called 'b' and assign the value 10 to it
b <- 10
# Type the object 'b' in console as a command to return value 10
b

# Create an object called 'c' and assign the value 9 to it
c <- 9
# Type the object 'c' in console as a command to return value 9
c

# Create an object called 'd' and assign the value 8 to it
d <- 8
# Type the object 'd' in console as a command to return value 8
d
Notice how the objects a, b, c and d and its value are stored in RStudio’s environment panel. We can perform the following arithmetic operations with these object values:
# type the following and return an answer
(a + b + c + d)/5

# type the following and return an answer
(5*(a-c)/d)^2
Let us create more objects but this time we will assign character string(s) to them. Please note that when typing a string of characters as data you will need to cover them with quotation marks "...". For example, say we want to create a string object called y and assign it with some text "Hello!". We do this by typing y <- "Hello!".
Try these examples of assigning the following character text to an object:
# Create an object called 'e' and assign the character string "RStudio"
e <- "RStudio"
# Type the object 'e' in the console as a command to return "RStudio"
e

# Create an object called 'f', assign character string "Hello world"
f <- "Hello world"

# Type the object 'f' in the console as a command to return "Hello world"
f

# Create an object called 'g' and assign "Blade Runner is amazing"
g <- "Blade Runner is amazing"
# Type the object 'g' in the console to return the result
g
We are now familiar with using the console and assigning values (i.e., numeric and string values) to objects. The parts covered here are the initial steps and building blocks for coding and creating datasets in RStudio.
Let us progress to the next section. We will learn the basics of managing data and some coding etiquette - this includes creating data frames, importing & exporting spreadsheets, setting up work directories, column manipulations and merging two data frames. Learning these basic tasks are key for managing data in RStudio.
Important Notes: We will be using R-scripts file for typing codes from this point onwards.